Tuesday, November 27, 2018
Thursday, October 26, 2017


Tuesday, October 17, 2017


Tuesday, July 11, 2017

Sunday, February 5, 2017
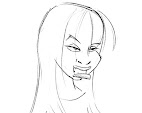
mental health
A friend of mine put out an all call request on FB for help illustrating emotions for a mental health project she was working on writing. I jumped at this opportunity to explore different ways to show extremes in emotions and how they sometimes feel overwhelming. The writing talks about these feelings and how to cope with them in a self checking sort of way. Here is the series of illustrations done in pen and water colour on paper. The concepts were hers and the visuals are my interpretations. It was a good exercise in creativity and working in water colour. I think we can all relate to feeling these ways sometimes.


Sunday, October 16, 2016
Bronze Medallion
I'd decided to take a Bronze 11 week course. We had one class to come up with the concept and one class to finish the plasticine sculpt. Not a lot of time so I took it home over the first two weeks to try to get it the way I wanted it before the wax stage. Here's the progress so far.  |
| Concept scribbles my initials and astrology signs |
 |
| Capricorn J |
 |
| Year of the dragon S |
 |
| Starting plasticine rough |
 |
| Starting plasticine rough |
 |
| borrowed tools from a friend |
 |
| starting to take better shape |
 |
| shape is getting there |
 |
| adding texture but looking messy |
 |
| added texture and fixed under cuts |
 |
| after getting some advice cleaned up the texture |
 |
| texture feels more like scales |
 |
| making the clay moulds |
 |
| Clay mould ready and poured plaster mixture |
 |
| plaster mould came away clean for negative |
 |
| only a small amount of cleaning was needed |
 |
| wax poured in mould cooled and removed needs some work to clean it up |
 |
| wax version now fused with the capricorn side needs more work to clean it up |
 |
| dragon side was bigger than the capricorn side some adjustments need to be made |
 |
| the two sides together are unbalanced not sure how to resolve this one to be continued.... I'd decided to add a small base so that the piece could stand on it's edge on it's own. Finally we are at the stage where we were able to add the wax funnel, sprews and vents. I didn't remember to take a picture before the next layer was added. oops.   Here is the thing of beauty with three layers of compound with a thin layer of fiberglass on the medallion wax piece. |


The next step was to make another cast mould case over the wax. The dry ingredients above needed to be mixed by hand thoroughly and I was the little helper volunteer to do this task. We ended up making 12 batches for each student. After the dry ingredients were mixed then warm water had to be mixed in.. thankfully I had my grubby clothes and an apron this was a very messy job. They used a drill mixer to finish the mixing to get the compound really smooth. We used wet clay to form a base then stiff plastic (sort of like a crazy carpet) to wrap around our pieces. Added more clay to seal the bottom .. then the wet compound was added to fill. This week after the investment mix is set the instructor will remove the set pieces from the plastic and clay and put them in the kiln at about 200 to melt out the wax. They will reuse the wax for another class. Then crank up the kiln to about 1000 to burn out the last of the wax to make sure they are totally clean for next weeks class. Next up is the bronze pour yay!

one Bronze ingot


My instructor did the pour for us. She did three at a time and mine is the one in the corner closest to us.. they put the moulds into a container then filled the walls around them with sand. This helps hold everything in place. The bronze is melted at 1200 degrees. One of the moulds had a crack in it so there was metal leaking out of it that they had to contain.

Tradition is to spit into the hot metal to put some of your essence into the piece. Even though mine had some small cracks it stayed intact.

After the piece has had a chance to cool for about 20 minutes or so we threw the moulds onto the floor to smash it open. The mould and metal were still hot to touch.

After much scrubbing with water and plastic brush to get off the inside mould composite the inner piece is finally revealed. The "J" Capricorn side.
There are a few flaws in the design I suspect from having some bubbles in the first layer of composite I'd put on.
There are a few flaws in the design I suspect from having some bubbles in the first layer of composite I'd put on.

The S dragon side.
Next week we cut off the extra metal vents and funnel cup at the bottom and clean up the edges.


I kept the base on so there was something substantial to put in a vice. First up was cutting off the upper vents with a hack saw and filing the nubs off . Then it was back to more scrubbing with steel wool and using a chisel and hammer and finally a mini dremel to get off most of the flaws.
The following week I had my instructor use a band saw to chop off the base for me.
The End Product!!
Completed Dec 08 2016
It weighs just over 2 lbs.


After a lot of filing and polishing with steel wool the final piece is complete.
I'd added a little bit of black patina to it to showcase the detail a bit. That is done by heating up the metal with a propane torch and dabbing on liquid compound that adds a darker colour to the metal surface.. then after it is cool rub back the desired amount with a course scrub sponge. The top coating is just a bit of cold wax, after that dries buff with a soft cloth. This has been a labour of love for sure and I'm pleased with the final product. It's been a great learning experience.
Subscribe to:
Posts (Atom)